.png?width=200&height=98&name=Horizontal%20PVFARM%20Logo%20(Small).png)
On the right hand side of your screen in PVFARM (and in this article) you will see a toolbar, it provides quick access to tools for adding objects, editing, selecting, toggling visibility, and managing camera perspectives. This article will detail each tool available. Note that often you will see an alternate way to access these functions by pressing certain keys, you can also see all of the keys available here.
1. The Plus Sign (Adding Objects) 
- Boundary Tools
-
"Draw New Boundary"
-
Add boundaries manually by putting down specific points.
-
- "Draw Rectangular Boundary"
- Draw rectangular boundary were you can define the width and height.
-
"Around Selected"
-
Create a boundary around a selected object.
-
Can be useful for creating offsets of existing boundaries.
-
- "By Hierarchy": Choose combiner box the inverter or the inverter
-
"Based on Terrain Elevation": Create boundaries based on the terrain’s elevation.
-
"Based on Terrain Slope": Create boundaries based on the terrain’s slope. Choose from drop down from NS and EW slope
- "Based on Terrain Cutfill": Create boundaries based on the cutfill on the terrain
-
- Road Tools
-
"Road": Generate a road directly.
-
"Around Selected": Create a road around an existing boundary. (Not usable anymore after the update)
-
- "SAT (Single-Axis Tracker):
- Opens the creation wizard for a new SAT object
- Fixed Tilt
- Places a Fixed Tilt object in the center of your scene
- Trench Tool"
-
Similar to road tools, used for drawing out trenches based on user-defined points.
-
- Shade Objects
- Shading Box- This selection will create a box object that can be used to recreate existing structures.
- Shading Tree- This selection will create a tree object that simulates the shade cast by a tree.
- Shading Wall- This selection creates a wall object, you will draw points like a polyline to recreate a long shade object.
- Around Selected- creates a shading wall around the selected object or group of objects.
- Waypoint
- Add an MV routing waypoint, to read more on these see The Electrical Panel
- "Clone Selected as Array"
-
Clone a object with configurable X/Y counts and offsets.
- "relativeToBbox" at the top refers to whether the offset measurements are from the edge of the item or the center. For example in the image below 3.2808 ft refers to the distance from glass to glass.

-
- Ruler
- Opens the measuring mode which allows you to place ruler objects.
- "Add to Catalog as a BIM Asset"
-
Integrates objects into your BIM asset catalog (see additional articles for more details).
-
2. The Pencil Icon (Editing Options) 
-
Basic Editing
-
Undo/Redo: Quickly revert or reinstate actions.
-
-
Gizmo and Points
-
Show Move Gizmo: Toggle the move tool (alternative to pressing T).

-
Edit Points: Activate point editing (alternative to pressing Tab).
-
-
Road and Boundary Editing
-
Trim Roads by Boundaries: Trim roads so they do not extend beyond selected boundaries.
-
Offset Boundary: Redraw boundaries with an added offset; option to clone or simply modify.
-
-
Block Numbering
-
Renumber Blocks: Resync numbering for selected blocks.
-
- Align Arrays By
- Row Start
- Row Middle
- Row End
-
Parent-Child Hierarchy:
-
Set Last Selected as Parents
-
Clear Parent: Remove or reassign parent-child relationships.
-
Delete Children Wires: Remove wiring between parent and child objects.
- This could be used to remove wires from a single block instead of the whole site.
-
Move Parents Only: When moving objects, only the parent moves while children remain static.
-
-
Grid and Orientation Settings
-
Snap to Grid: Enable snapping to the defined grid (grid size is shown at the bottom).
-
Orientation: Toggle between global and local orientations.
-
Pivot Options: Adjust pivot settings (box, origin, manual) for better control in 3D space.
-
3. The Arrow Icon (Selection Options) 
- Selection Functions
-
Select All: Quickly select all objects.
-
Select Within Boundaries: Limit selections to specific areas.
-
Page Up/Page Down: Toggle selection between parent and child objects in the hierarchy.
-
- Advanced Selection Tools
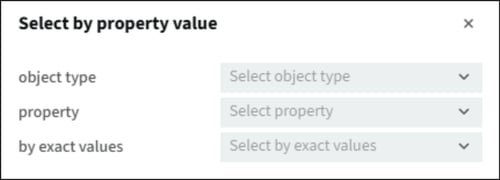
- Property Value Selection: Use Shift+S to select objects based on their property type.
-
-
Invert Selection: Reverse the current selection.
-
Clear Selection: Deselect all selected objects.
-
4. The Eyeball Icon (Visibility & Colorization) 
- Waypoint
- Makes the MV routing waypoints visible in your layout
-
Visibility Controls
-
Show All/Isolate: Toggle between isolating a block and showing all objects (also available via Control H).
-
-
Colorization Options
-
Colorize Hierarchy: Apply color coding to hierarchy elements.
-
Colorize Trackers by Position: Color-code trackers by their spatial arrangement.
-
Clear Colorization: Reset the color scheme to a neutral view.
-
-
Annotation and Rendering
-
Show Annotations Toggle: Turn annotation numbers on or off.
-
Show Tracker Piles Markup: Display additional tracker pile information.
- Show Hidden Equipment as Ghosted: Hidden objects will still be visible but with a decreased opacity
- Hide Small (on screen) wires- Small wires won't render unless zoomed in.
-
-
- Always Represent Trees as Boxes- Trees will render as boxes to reduce load times.
5. The Camera Icon (View and Perspective) 
-
Camera Controls
-
Undo/Redo Camera Movements: Correct any unwanted camera adjustments.
-
Focus Selected: (F button) Zoom in on selected objects.
-
Focus Single/Next/Previous: Navigate through objects in sequence.
-
-
Perspective Options
-
Toggle Perspective: Use the 0 key (numpad) to switch between perspectives.

-
Home View: Quickly revert to a standard ISO view using Control F.
-
Preset Views: Access top, bottom, front, back, right, and left views (also represented in a compass-like tool).
-
-
Screenshot Capabilities
-
Top View Screenshot: Capture a top-down image.
-
Current View Screenshot: Generate a PNG screenshot of the current view.
-
-
Camera Controls Mode
-
Flat 2D
- Orthographic 3D
- Perspective 3D
-
-
Zoom to Cursor: Focus on the cursor location.
6. Manual Blocking
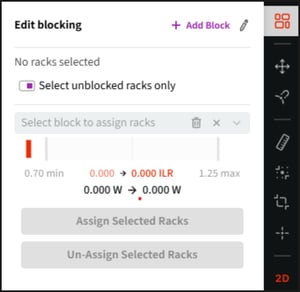
- Add Block: Select to add a new skid to your layout which will add a block to your available blocks
- Pencil Icon: Edit what equipment is used when you select the Add Block option
- Select Unblocked Racks only: Toggle on if you want to be sure not to re-assign racks the are already in a block.
- Select block to assign racks: A drop down menu of all available blocks in the layout. Select which block you would like to add or remove racks from
- Trash Icon= remove the skid for that block, leaving the previously connected racks unblocked
- Assign Selected Racks: Assign the racks that you have selected in the scene to the block that you have selected in the manual blocking tool.
- Un-Assign Selected Racks: Will un-assign the racks that you have selected in the scene from the block that you have selected in the manual blocking tool.
7. The Rest (Shortcuts)
-
- Move
- Snapping
- Opens the Snapping menu, which gives various offsets that when in edit mode will be available as snap points.
- Ruler (R)
- See part 1 above
- Isolate (Shift+H)
- See part 5 above
- Crop (C)
- Note that this crops your view, it does not make any permanent changes to anything in your scene.
- Focus Selected (F)
- See part 5 above
- Toggle Dimensions
- Toggles between 3D and 2D
- Toggle Perspective (Num Pad 5/0)
- See part 5 Above