The Project Panel
Everything you need to know about the Project Panel
The Project Panel in PVFARM contains 3 tabs that let you view your project version at a glance and quickly change settings as well as import imagery and public topography.
Overview Tab
The first tab is an overview of your project as it is currently loaded. This gives you comprehensive information about the costs, important information like AC/DC ratio, numbers of modules and trackers, as well as GCR just to name a few. Simply expand one of the categories to see the metrics.

- Catalog Version- This displays what version of the catalog is loaded.
- Project Version- This displays which save version you are currently working out of.
- Selected Area- If there are subareas in your project you can look at the metrics by subarea
- Click on the drop down arrow and select the areas you want

-
- You will see columns for each area in your metrics

Settings Tab
The next tab is where you can adjust/review your project settings.
- Project Name- This is where you can change the name of your project
- Project ID- This is a unique number for your project, you can also find it at the top of your settings and in the URL of the project. This is important to know when getting help from our team as it helps us to know what project you are working out of.
- Status- Your project can be set as active, sandbox, archived or complete. The status will determine where in your dashboard the project is stored.
- Availability- This is where you determine if the project is private (Only Me) or available to others (My Company).
- WGS Standard- This is the preferred geocoordinate system
- Latitude, Longitude- This is determined by the geocoordinate information that comes in when you are importing. Changing these numbers will not adjust the geolocation of your project.
- Currency- Currencies used when calculating costs can be in USD or Euros.
- System of Units- You can switch between Imperial and Metric units
- These can be switched back and forth easily in a project, we recommend switching to metric when creating equipment for your catalog.
Map Underlay
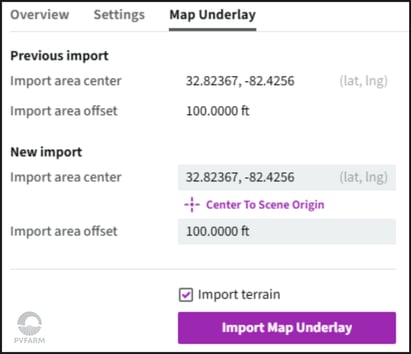
The third tab is where you can import an image and public topo to cover your project area.

- Previous import- This is the area of your last import
- New Import- This is the area that your are currently selecting for import
- Import area center - This is the lat/long of the center of your import. If you have georeferenced files in the scene this will automatically select. The user can also input a lat/long if working in a blank project.
- Import area offset - this is the area outside of your objects in the model that you would like to use to find imagery
- Import Terrain- This check box will import public topo data that covers the area of the imported image.
.png?width=200&height=98&name=Horizontal%20PVFARM%20Logo%20(Small).png)