.png?width=200&height=98&name=Horizontal%20PVFARM%20Logo%20(Small).png)
You can either create your equipment pack by yourself or send us a Request, and we will assist you with that.
What to consider before creating an asset
The most challenging part of creating an asset is gathering the correct data and characteristics for that asset. Therefore, it is crucial to collect all the necessary data about the asset before commencing the creation process.
Below are a couple of examples of the data you need to create an asset:
-
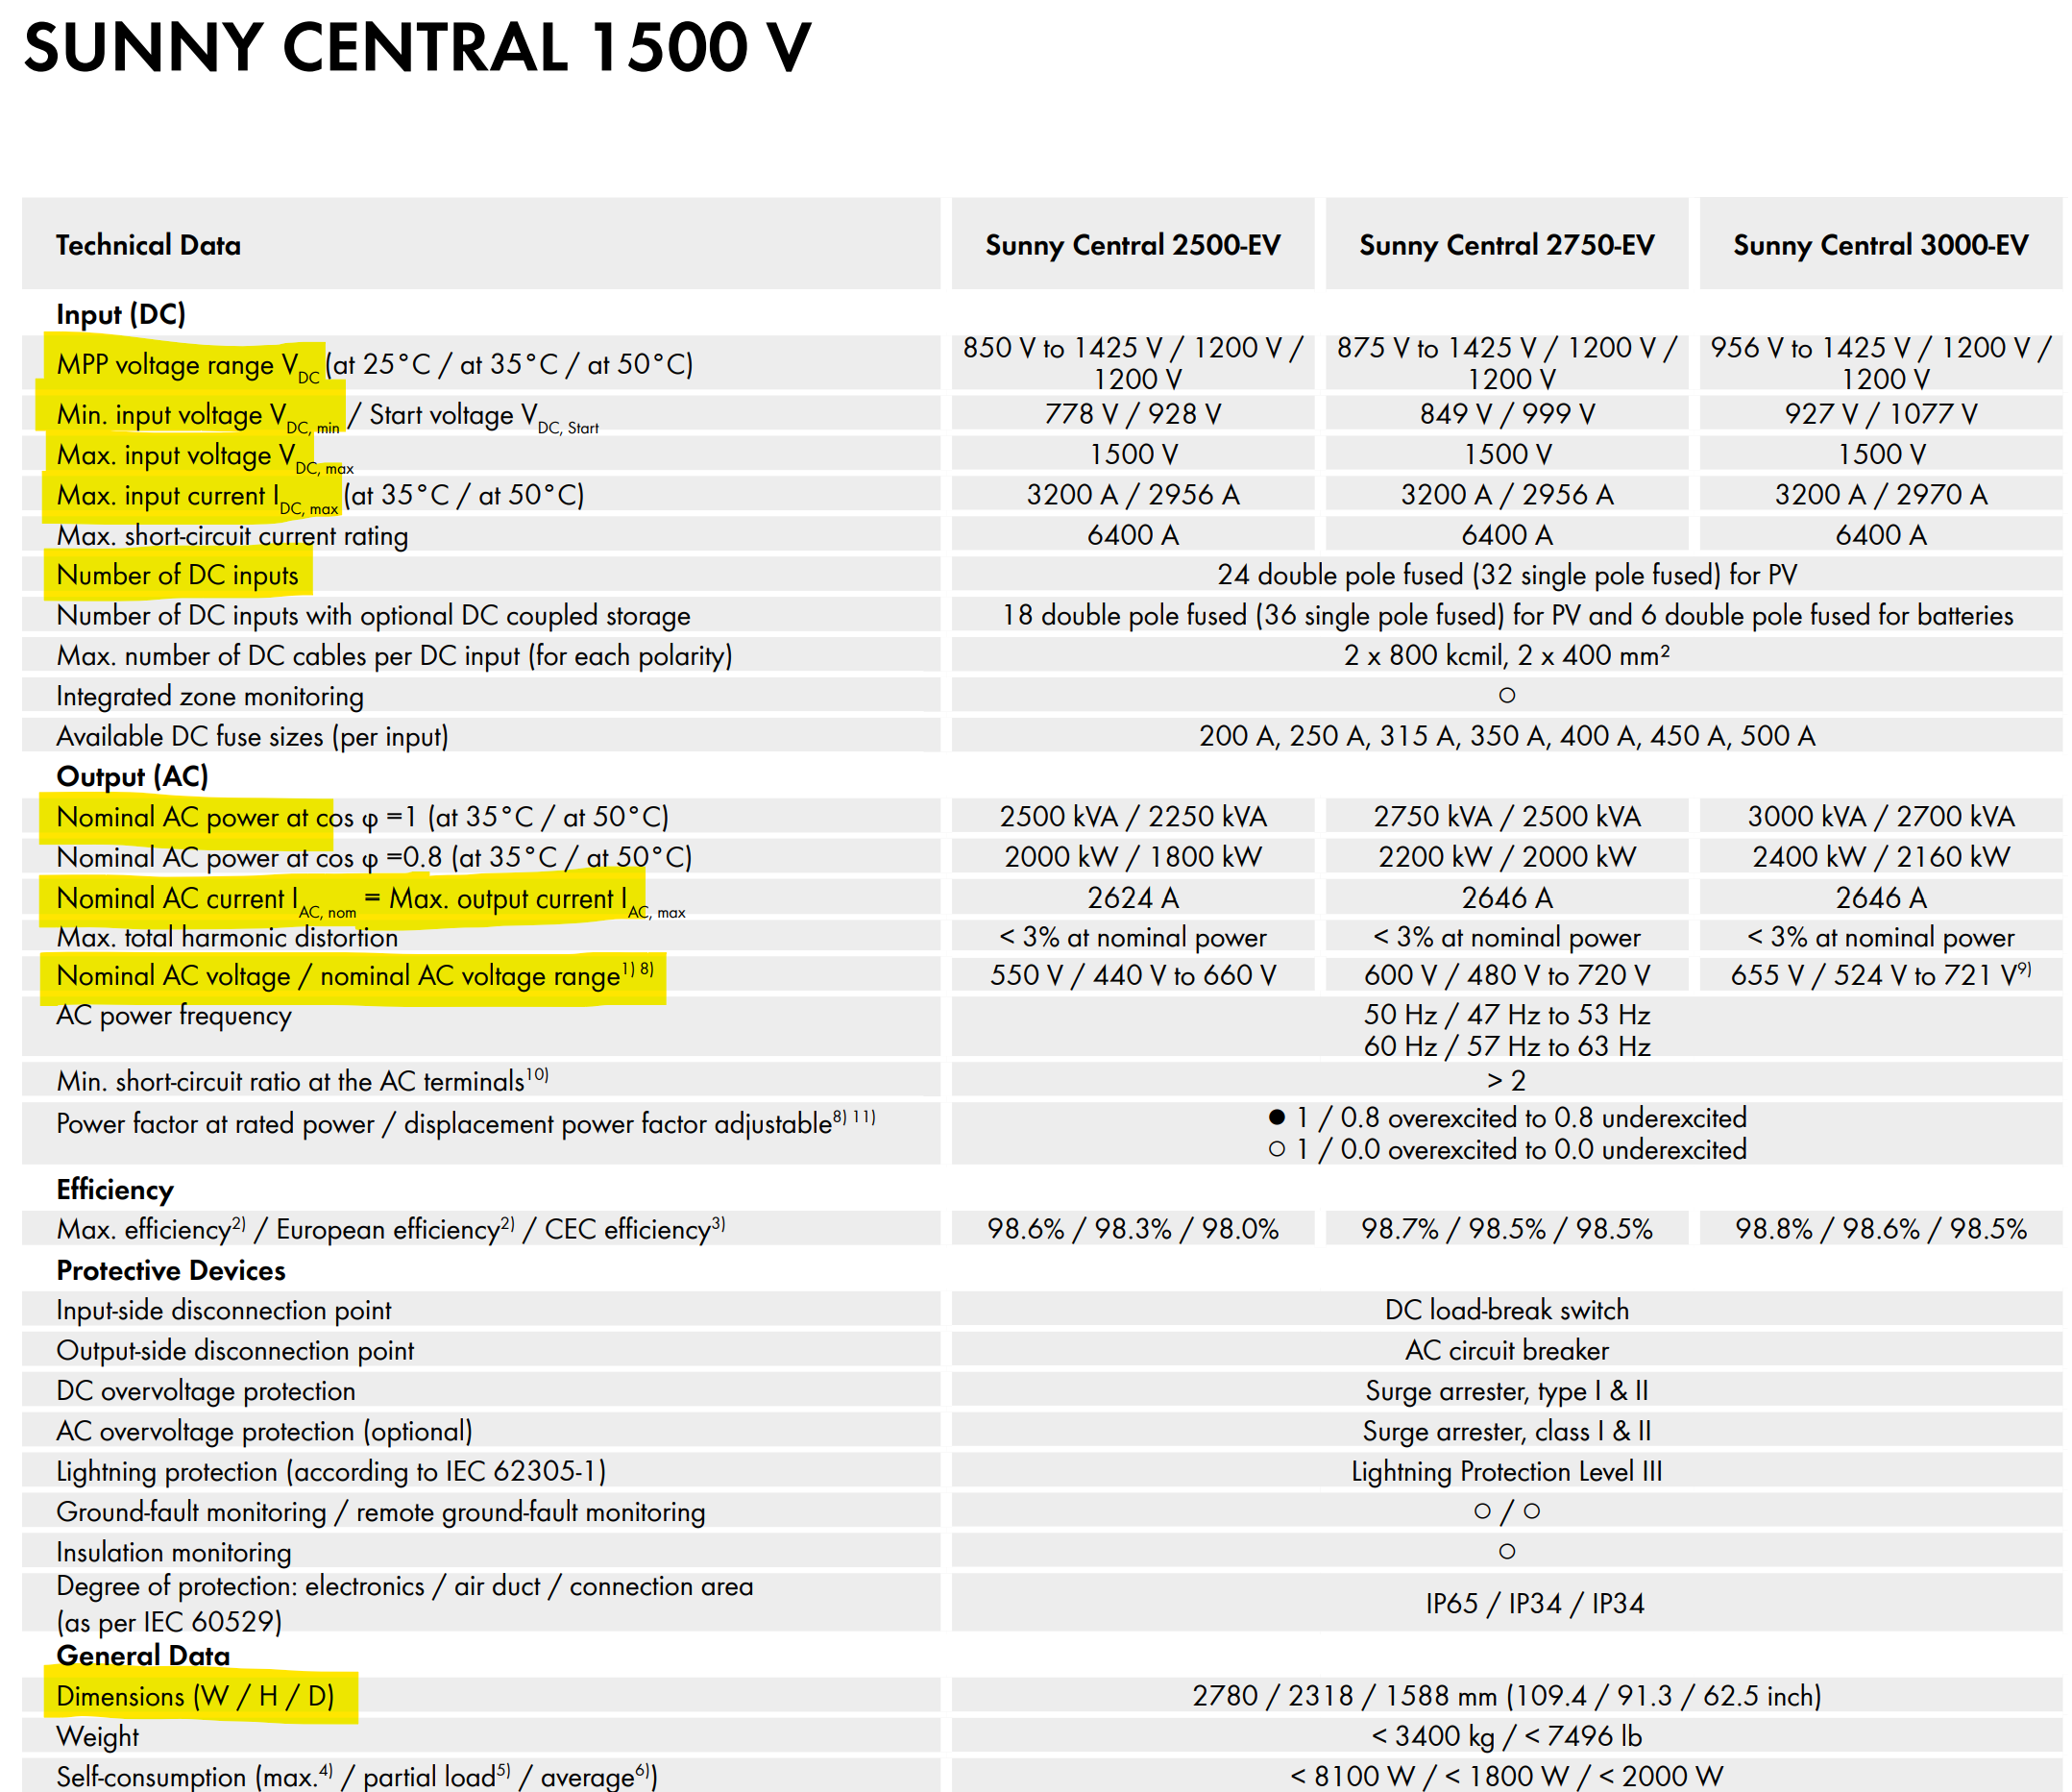
Transformer & Inverter - a table from the manufacturer's spec
-
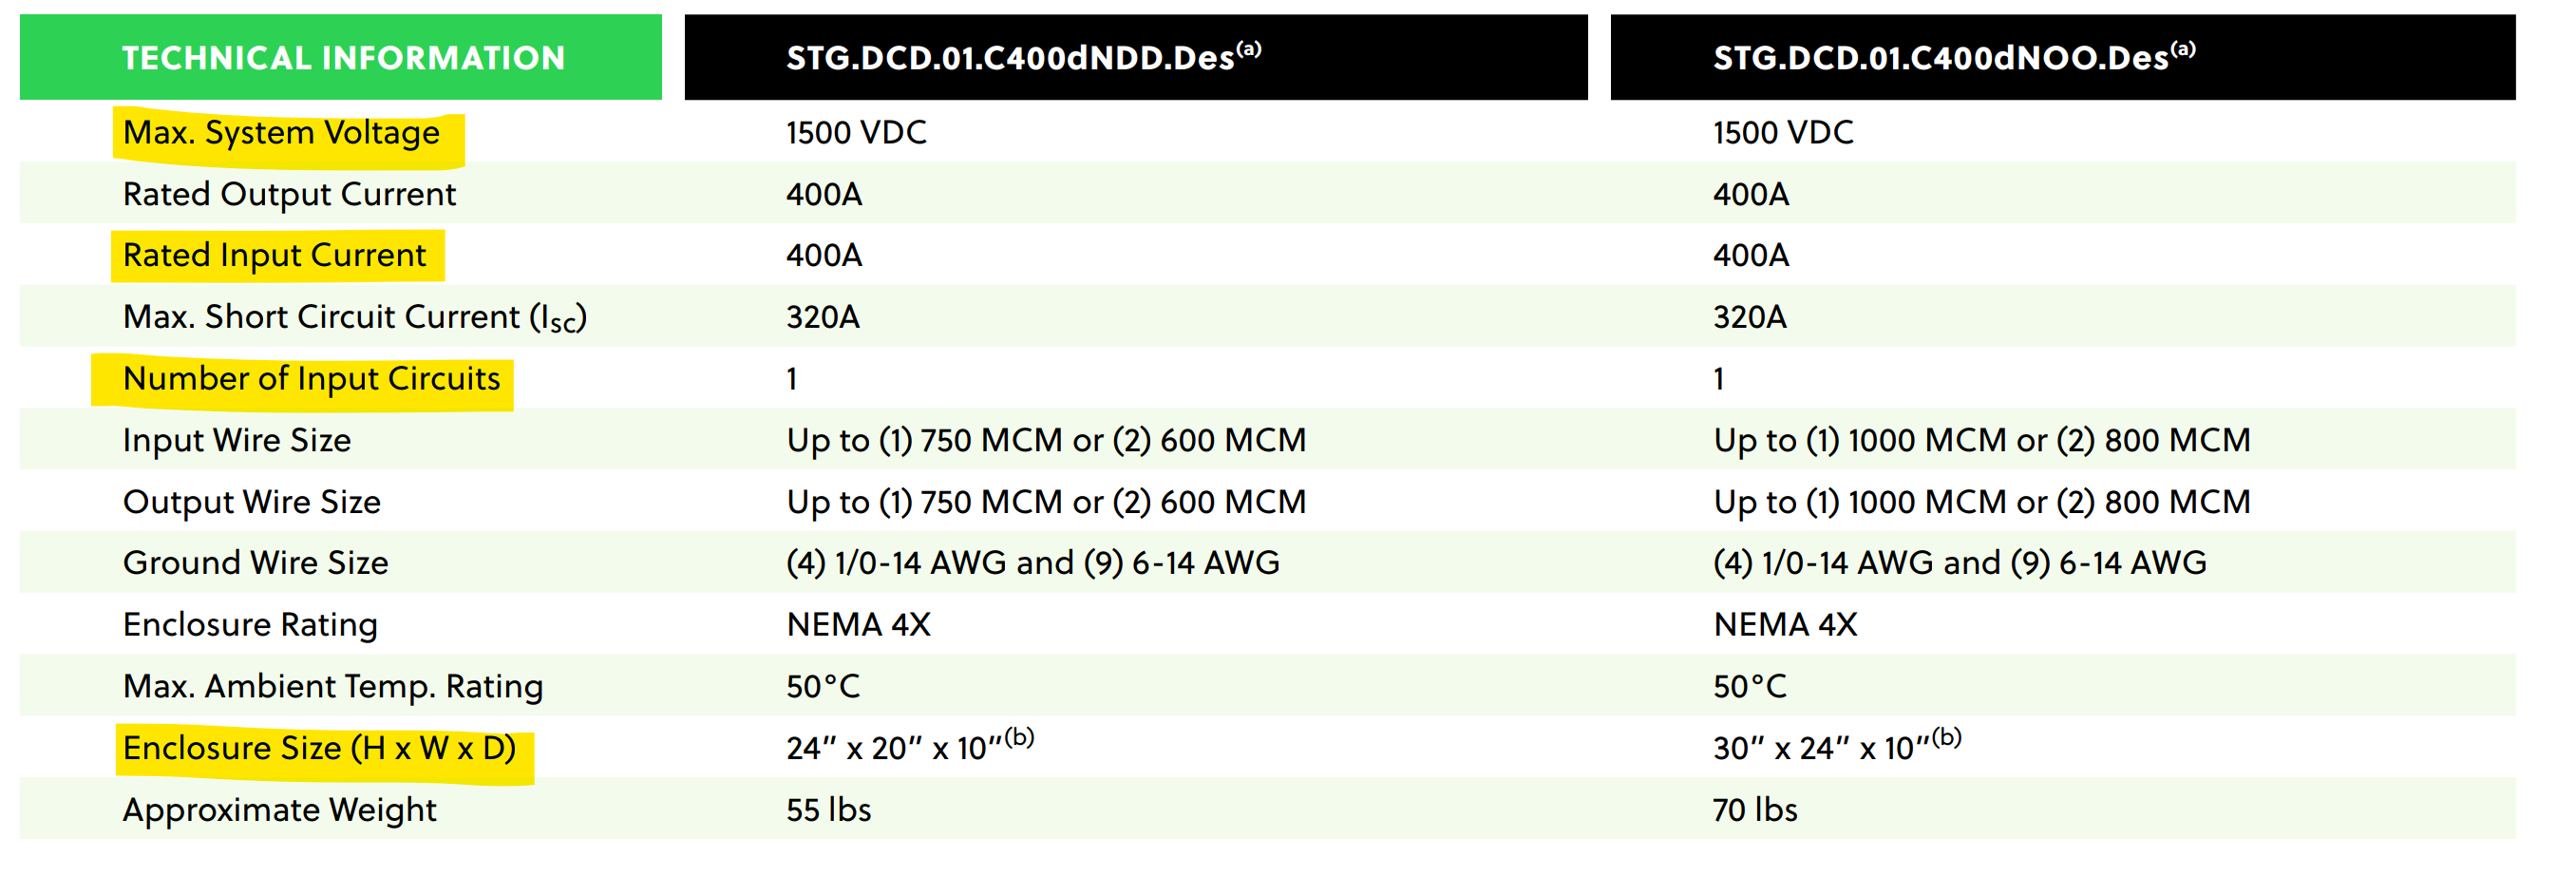
Combiner box - a table from the manufacturer's spec
-
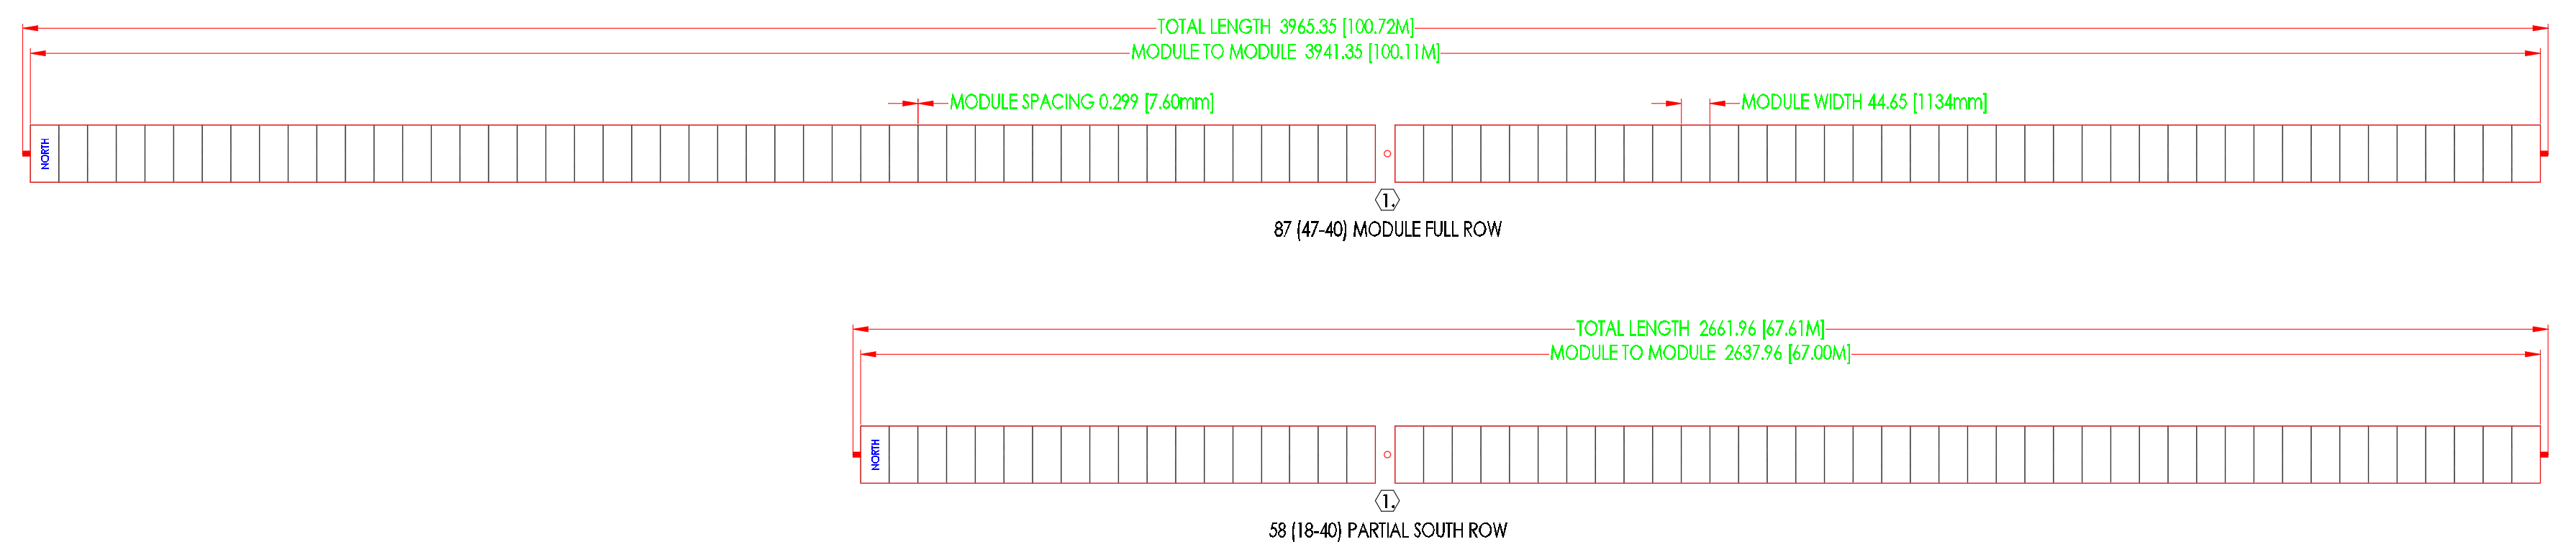
SAT (Single-Axis Tracker) and FT (Fixed-Tilt System) - a screenshot from the DWG with all dimensions
-
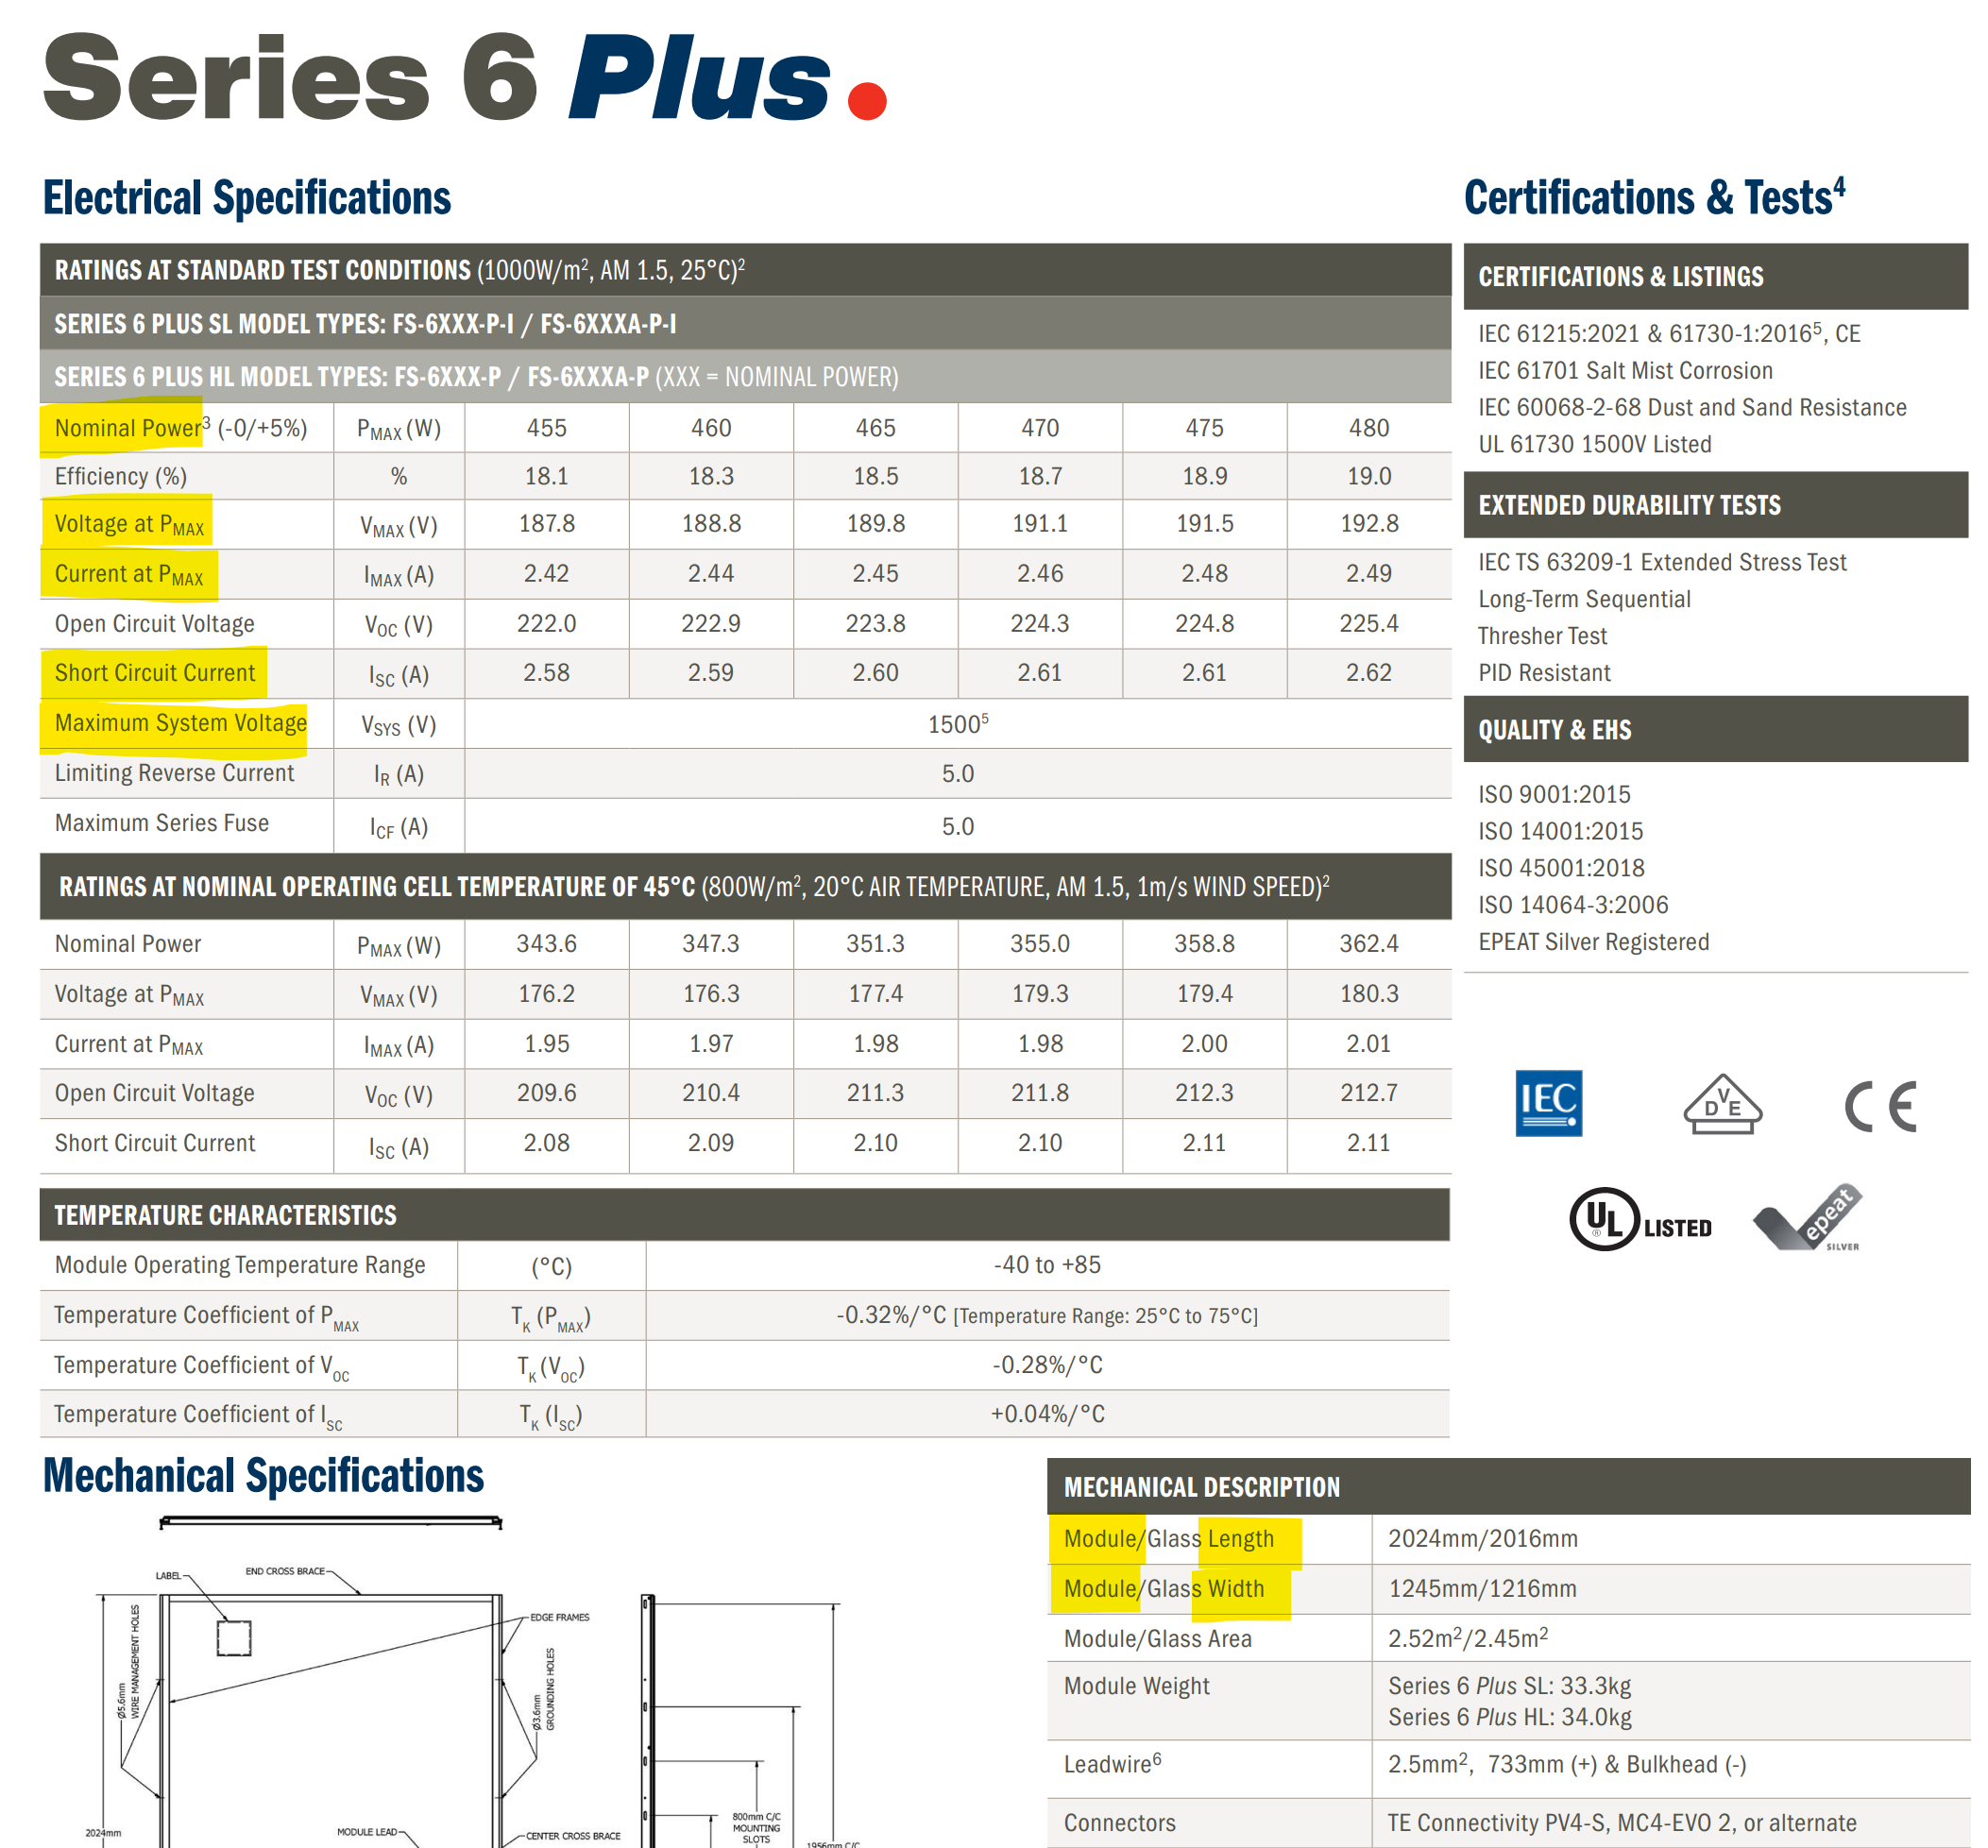
PV-module - a table from the manufacturer's spec
It is important to mention that for inverters and PV-modules, the PV Farm App can parse your PAN and OND files, which are an industry standards for this equipment. You can find a couple of downloadable examples at the bottom of this article.
💡 Please, make sure to follow these guidelines:
-
Ensure that you have the latest data for your equipment (we recommend using technical documentation from the equipment manufacturer)
-
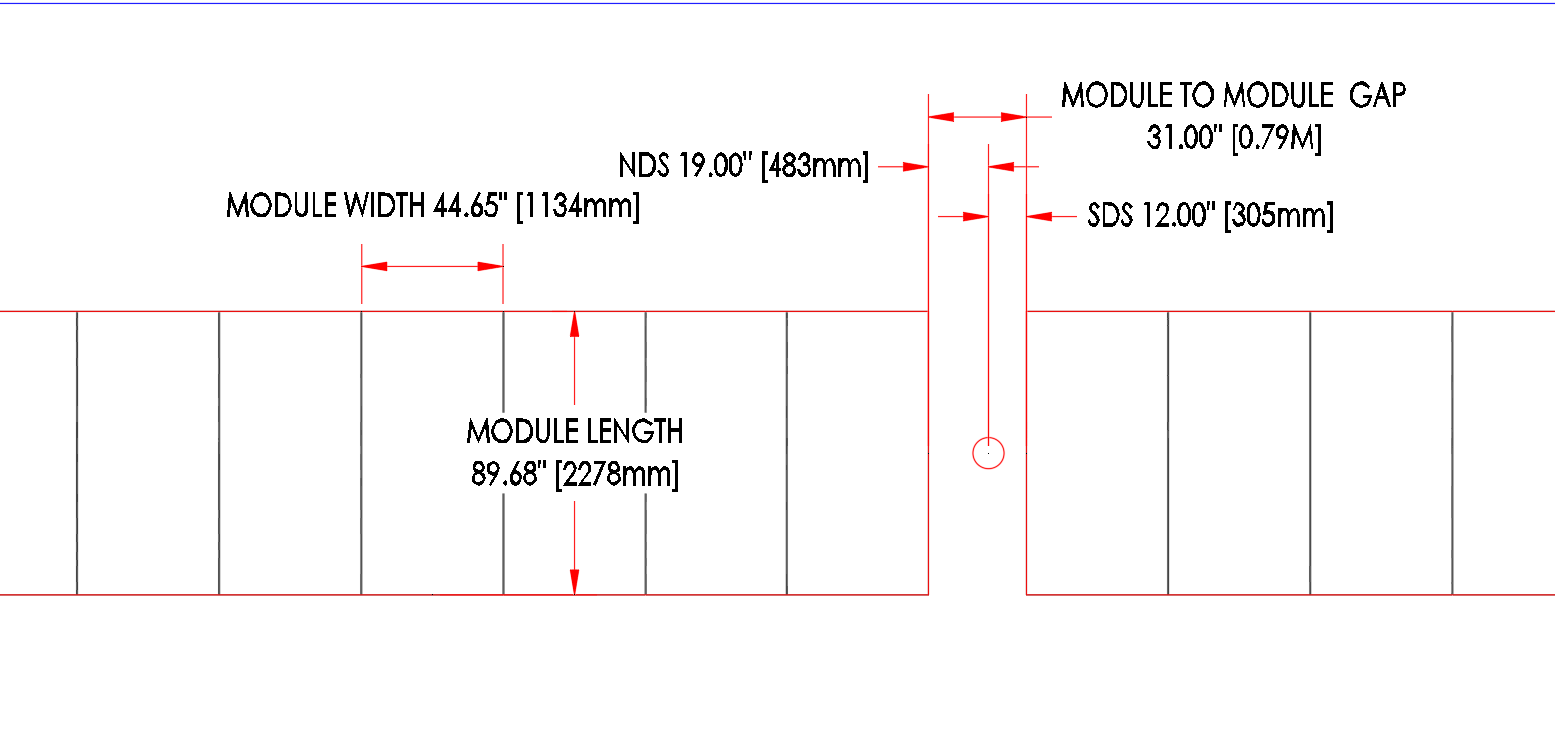
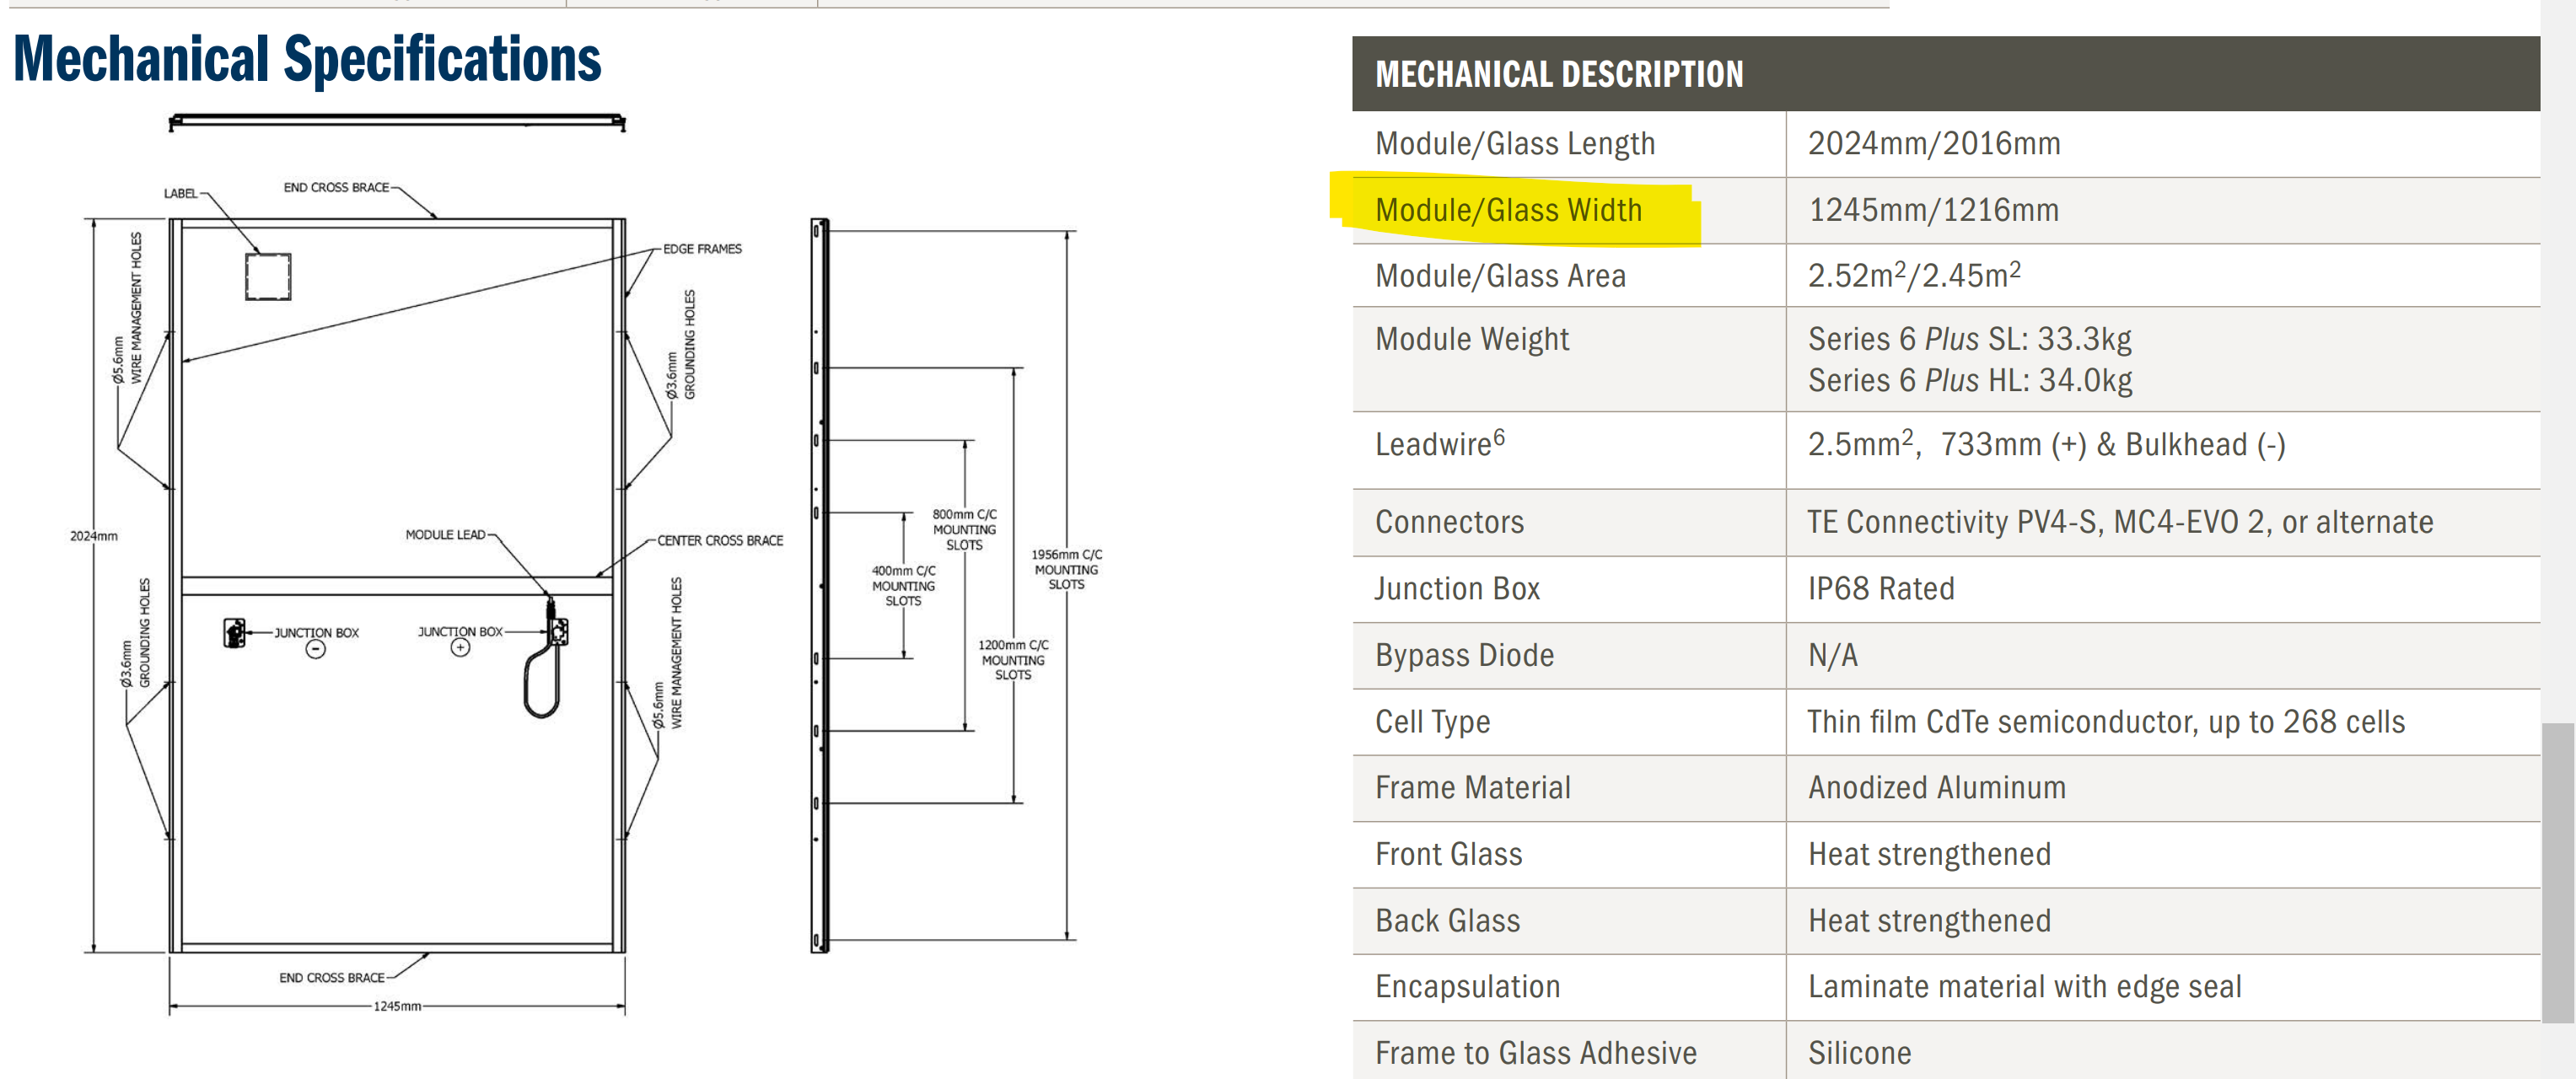
Take note of the distinctions between glass width/length and module width/length. The module width/length should encompass the module frame size. Please refer to the image displayed below:
-
When using the PVFarm App, utilise the module width/length dimensions, including the frame.
-
Verify that the tracker frame and PV module bin class are compatible, and confirm that the hole spacing is sufficient.
How to create an equipment asset
The most effective approach for creating assets, excluding modules, inverters, and Trackers, is to modify existing equipment assets and save them as new ones. However, when it comes to PV modules or inverters, the ideal method is to upload a PAN or OND file. In case you don't have access to those files, we will guide you on alternative methods to create them. Trackers will be created using the SAT creation wizard.
Create a new PV Module
There are two options to add a new PV module
-
Upload a PV module as a PAN file.
Please dive into the article How to upload a PV Module or Inverter as a PAN/OND file for details. -
Create a new one manually based on a catalog's existing items.
-
Go to the Catalog view and select an existing PV module from the available options.
-
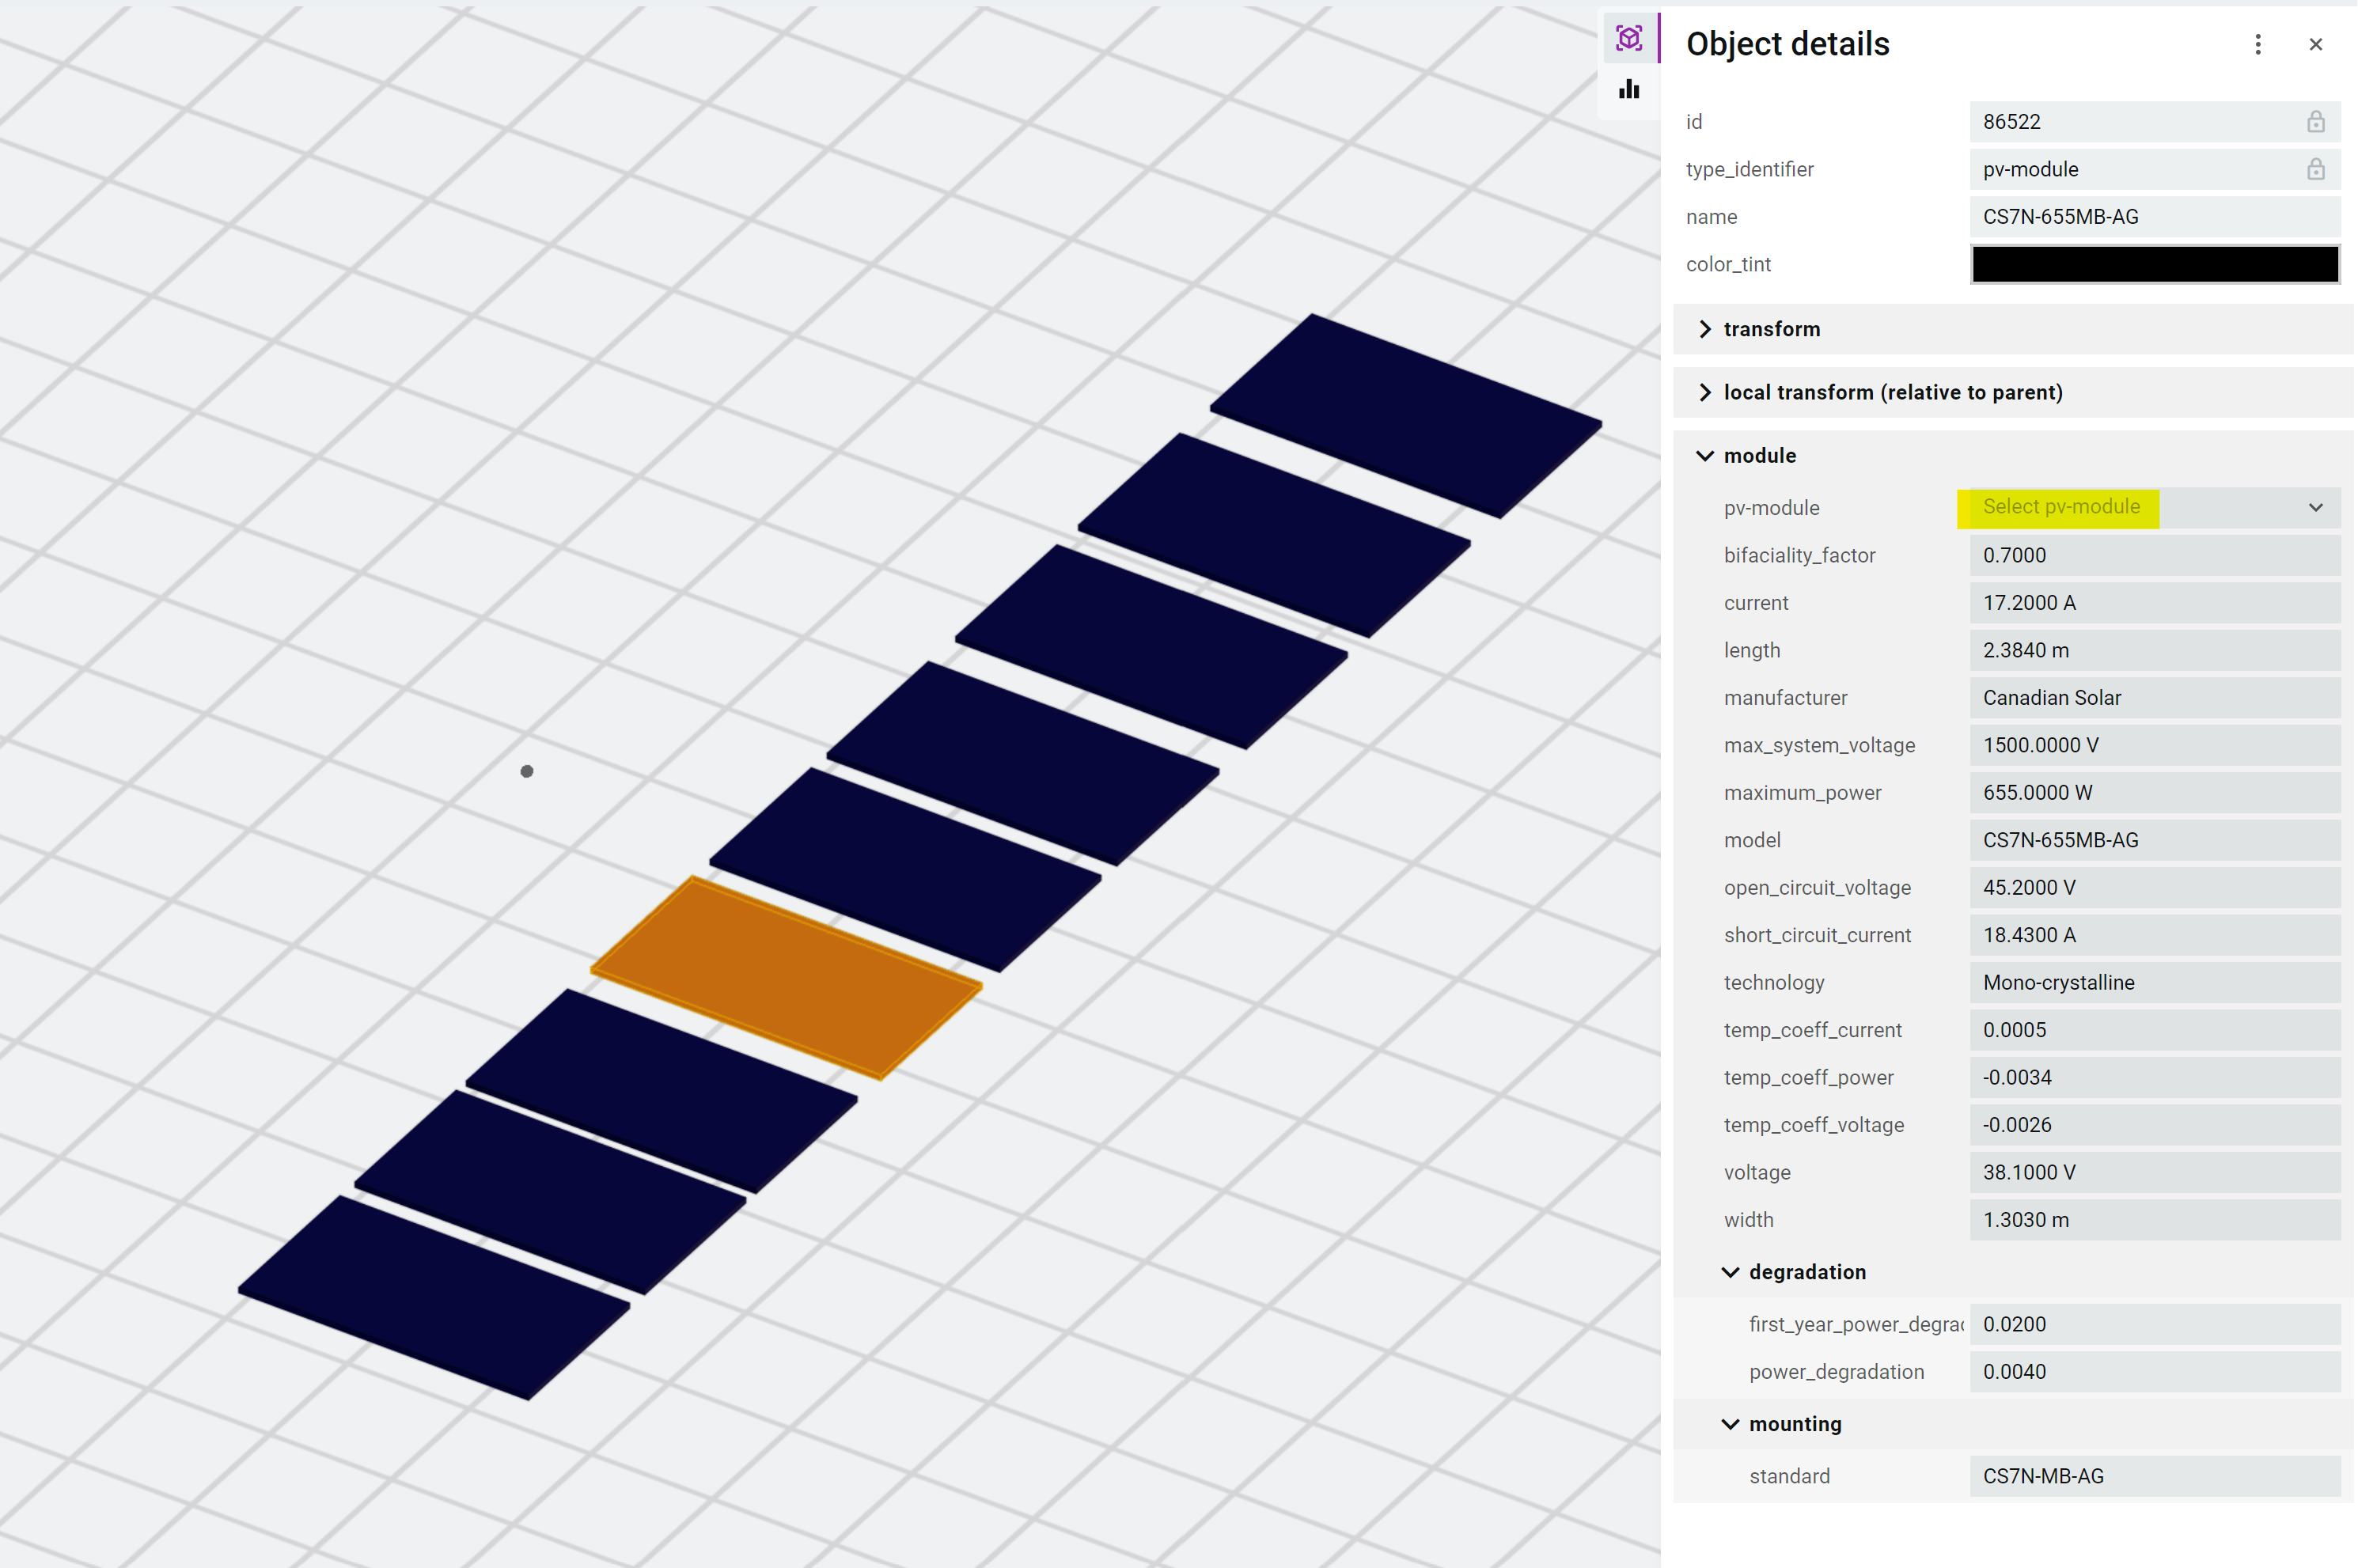
Insert the selected PV module into the 3D scene by placing it in the desired location.
-
Modify the properties of the PV module to match the specifications you have.

-
The PV module field is empty before you save a new item to the Catalog
-
Set up the mounting standard and match it with the tracker's frame mounting standard
-
For the standard value, use the model of PV modules you're going to match with the tracker frame
-
For example, the CS7N-TB-AG standard includes a pack of PV modules 685W, 690W, and 695W
-
-

-
-
Add → Add selected item to the catalog as .bimasset
Observe the new asset notification and the saved PV module appears in the properties
-
-
Save the Catalog version to make a new PV module available for your team.
Create a new Tracker
-
Either in the Tool Bar menu or the Project Assets panel, select: + > SAT (single-axis tracker) or Add "Single Axis Tracker Series"

Or Add "Single Axis Tracker Series" if working out of the Project Assets Panel
- From here you will have two options:
- Create New using the creation wizard

- Select what kind of gaps you'd like to use:
- between all piles
- on motor pile only
- no pile gaps
- Next you'll enter the remaining basic information
- Manufacturer
- Product name
- PV module
- Module layout/orientation
- Number of modules per string
- Cold panel voltage

- Press "Finish Setup"
- Select what kind of gaps you'd like to use:
- Duplicate Existing
- Select a SAT object that was used in another project.
- Create New using the creation wizard
- Observe the SAT is added to the list of available project assets.
- Select the Series of SAT that you just created, this will open a Single Axis Tracker menu
- You can adjust the models that are in the series you just created
- Add New Models if you need more than 3 string lengths
- Further edit your SAT series by pressing the pencil icon
- Adjust the existing string lengths
- Adjust the gaps between modules and piles
- Adjust the pile types and locations
- You can adjust the models that are in the series you just created
- You can now use your new SAT series when updating layout
- From here you can simply use your SAT in your project, or if you are building out your company's catolog, proceed to the next step.
- Save the new SAT into the Catalog
-
-
Select the Tracker on the 3d view or in Project Assets
-
In the Tool Bar menu, select: Add > Add selected item to the catalog as .bimasset or select the 3 dots to the side of your tracker series and select Add to Catalog.

-
Confirm the SAT is added to the Catalog
-
Combiner box
-
In the Catalog view, select an existing Combiner Box from the available options
-
Pay attention to the CB type, whether it is AC or DC, to ensure it aligns with your specific requirements
-
-
Add to scene

-
Modify the Combiner Box properties to match your specifications
-
Save it to the Catalog
-
Select the new Combiner Box on the 3d view
-
Project → Save as .bimasset to Catalog
-
-
Save the Catalog version as a new one
Inverter
-
Select the existing Inverter in the Catalog view
-
Pay attention to the Inverter type, whether it is a String or a Central one, to ensure it aligns with your specific requirements
-
-
Insert it on a 3d view

-
Modify the Inverter properties, taking into consideration both the 'inverter module' and the inverter assembly properties
-
Save it to the Catalog
-
Select the new Inverter on the 3d view
-
Project → Save as .bimasset to Catalog
-
-
Save the Catalog version as a new one.
Transformer
-
In the Catalog view, select an existing Transformer from the available options. Pay attention to the Transformer type, whether it is Skid or no-Skid, to ensure it aligns with your specific requirements.
-
For Skid Transformers: This indicates that the transformer and inverter are installed on a single foundation pad or frame.
-
-
Insert it on a 3d view
-
Adjust it with the properties based on your project specifications.
-
Save it to the Catalog
-
Select the new Transformer on the 3d view
-
Project → Save as .bimasset to Catalog -
Save the Catalog version as a new one.
-
Save the Catalog with newly created equipment
-
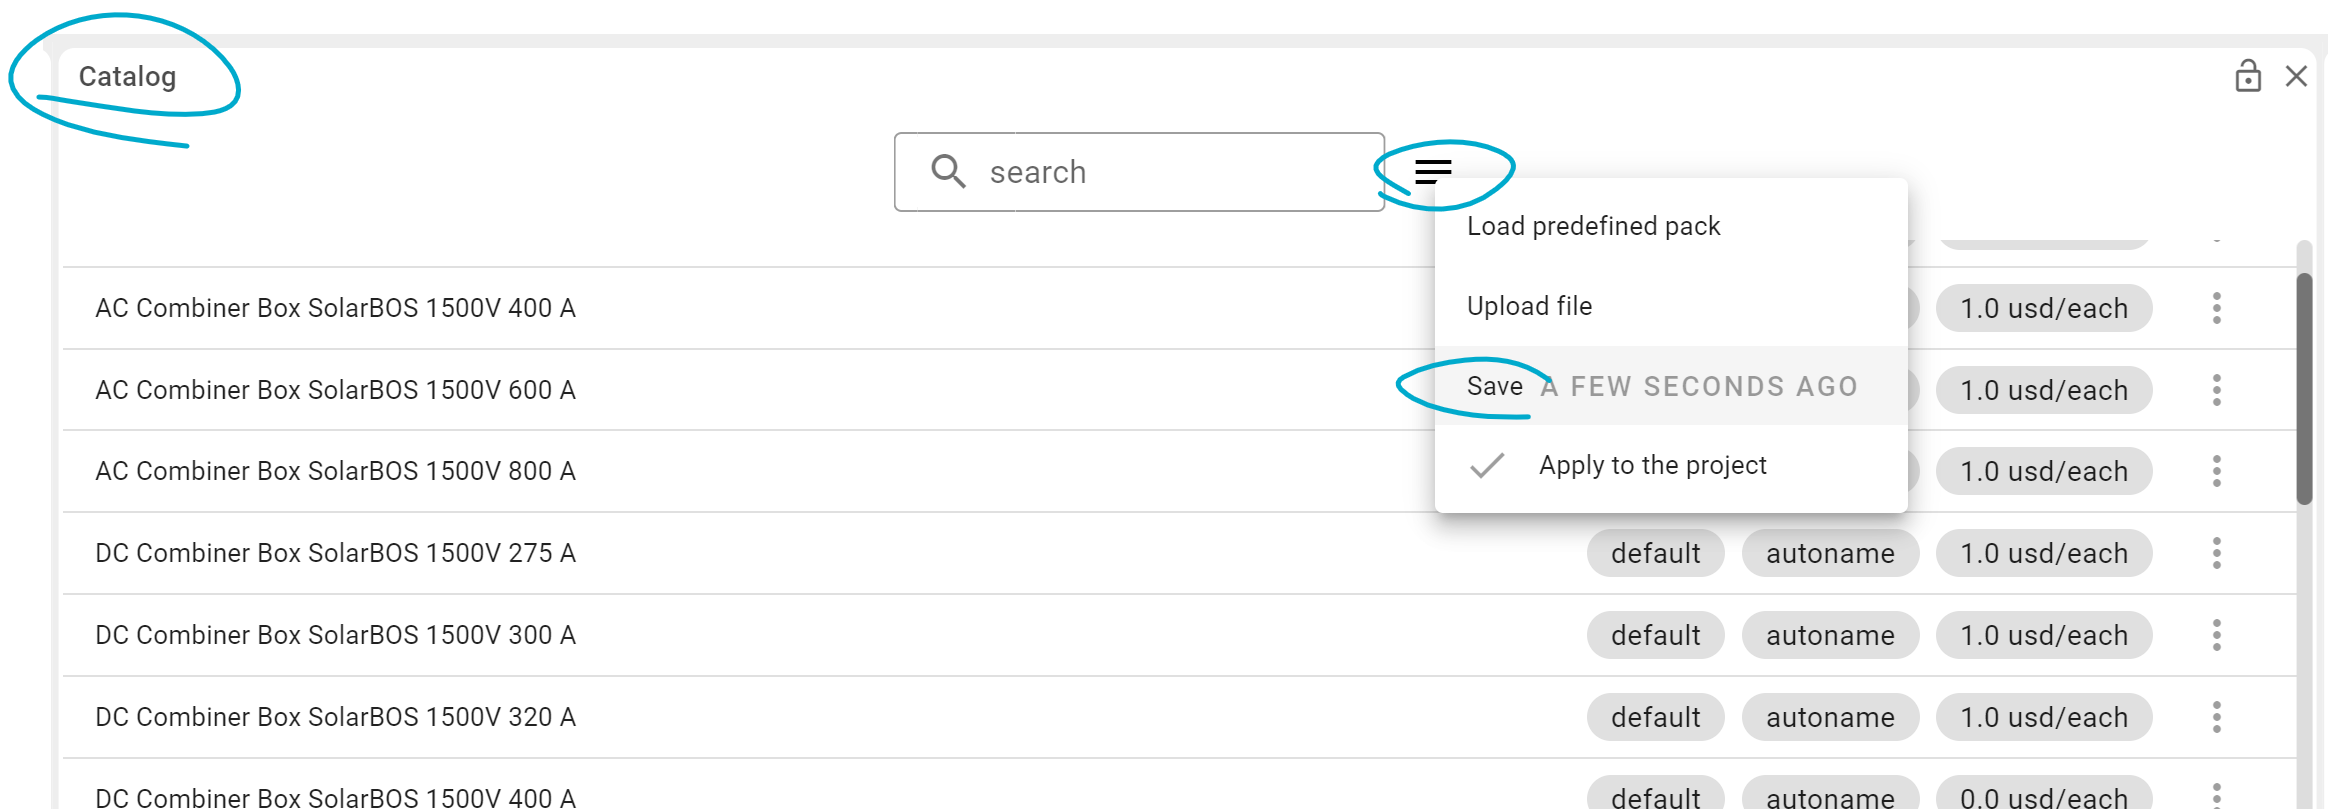
Open the Catalog View in the application.
-
Locate the 'burger' menu icon (often represented by three horizontal lines) typically found in the top corner of the Catalog View.
-
Click on the 'burger' menu icon to expand the menu options, and then select the "Save" option.
-
After selecting "Save," ensure that the Catalog is saved with a version labeled as "a few seconds ago" or a timestamp reflecting the most recent changes made.